
There are so many things we buy which come in tin cans. Market is full of products packed in cans. So we end up stacking up these cans, ready to be trashed. But like my other craft work, I had an amazing idea of transforming these used cans into a beautiful wind chime.

Below are the list of material required and the step by step instructions for making this beautiful wind chime with minimal cost. So here we go-
Things we need-
- 5 empty cans
- Spray paints ( I used red and yellow)
- Twine
- Black permanent marker
- 2 lids of yogurt ( 2 lb and 4 lb)
- Super glue
- a cylindrical shaped piece of transparent pipe/ straw (optional)
- Craft gems
Step by step instructions-
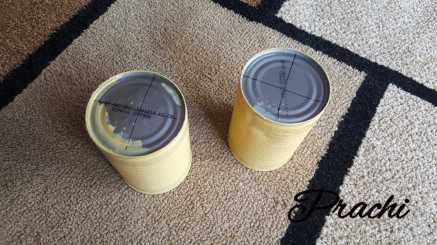
- Take the cans and spray paint them. I had painted 3 cans in red and 2 cans in yellow ( you can paint all of them in one color if you like). When they are completely dry, make a plus (+) sign on the bottom of them to get an idea of the center . Its not really very important to do so if you are able to make a small hole in the center without making a plus sign.
- Cover the central part of the can with the cello tape. In case you don’t have 2” duct tape, use thin one. Leave one inch gap from the top uncovered.

- Now spray paint it in the other color . For instance if the can is yellow, paint the top portion in red. Leave them upside down for an hour or some more till they are dry. You can spray paint inside the cans to give it a neat look.

- Take off the tape neatly. You will see the two paints are not mixed with each other.Instead there is a neat edge of the paint. Decorate the cans with black permanent marker at the point where you see the other paint starts. By doing this, you can hide the untidy edge of the paint (if it is there), plus it will add the beauty to the painted cans.

- Take the lids of the yogurt and spray paint them. You can avoid painting the bigger lid from the center, that’s not required.
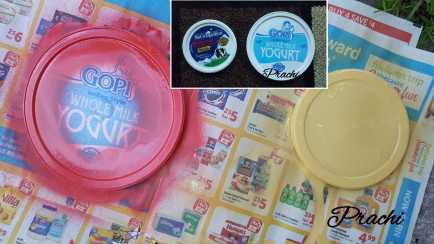
- When the lids are completely dry , put the yellow on top of red lid keeping the equal distance from all the sides. Stick the yellow lid on the red one, with help of super glue. Decorate it with the craft gems. Don’t forget to decorate the edgy sides of the lids.

- Send the twine through the hole in the bottom of the cans. Tie a knot (see the encircled part in the picture) so that the twine won’t come out.

- Follow the above step for all the 5 cans. The length of twine would be approximately 1 meter, but each one will be 2-3 inches shorter than the previous. Look at the image below for better understanding.

- Make 5 holes in the corner of the red lid. Pass each twine which is holding a can, through the holes. Believe me this was the hardest part till now, because you have to leave them dangling in such a way that they should be dangling 1-2 inches lower to each other in order. It wasn’t really easy to do so but yes its not impossible too. So, you can do it. Use a transparent piece of pipe or a cylindrical toy (see the encircled part in the image) for passing all the pieces of twine all together. Don’t leave them loose, make plaits and tie a knot at the end and the beginning, so that the plaits won’t get opened.
 Now it’s ready to be hanged.
Note: a)Use gloves when you use spray paints, spread old newspaper on the ground before using spray paint.
b)Use spray paint in an open area.
c)Heat a thick pin to make holes in the lids easily .
d)Don’t spray paint after making holes in the lid, it might close the tiny holes.

Loved it 🙂
LikeLiked by 1 person
Thanks for the appreciation!
LikeLiked by 1 person
Beautiful
LikeLiked by 2 people
Thanks Atul
LikeLiked by 1 person